Getting Started
Installing The Plugin
Gunsmith has been tested against the built-in Third Person Shooter and First Person shooter projects but should work in any project that you have the relevant meshes and animations for. For the sake of this tutorial we will be using the ThirdPerson template.
The first thing you will need to do after creating your project is to download the plugin from the Fab Marketplace or via Git (Not Currently Available). Gunsmith only supports Unreal versions 5.6 and onwards so make sure that your engine version matches this.
Note
Unreal 5.5 can be targeted if you are able to edit your engine source code. Add the following to NetworkPredictionWorldManager.h:
public:
    const FFixedTickState& GetFixedTickState() const { return FixedTickState; }
If downloading via Fab, add the plugin to your project via the Epic Games Launcher. Otherwise, copy the plugin to your Project or Engine Plugin folder and regenerate your project files.
Finally, enable the Gunsmith plugin from your Unreal Editor via the Edit->Plugins menu. Alternatively you can manually edit the projects .uproject file.
"Plugins":
[
  {
    "Name": "Gunsmith",
    "Enabled": true
  }
]
If you intend to use Gunsmith via C++ you’ll also need to add “Gunsmith” to your PrivateDependencyModuleNames in your projects build.cs file.
Setting Up Collision Layers
Now you will need to add a trace channel and preset for the rollback collision to use. As primitives will be moving around at a different rate to the simulation during rollback (sometimes many moves per frame), we need to ensure that the hit validation trace is not going to hit any non-validation primitives.
In the editor, go to Edit->Project Settings->Engine->Collision and create a new Trace Channel. Name this ProjectileTrace and set it to Block by default as it is the trace channel that we will set all projectiles to use by default.
Caution
You will need to make sure that any collision presets that should not be hit by projectiles (e.g. triggers) set this channel to ignore. You should also set any targets that will use a Rollback Proxy to Ignore such as Pawns. The only layer that should block the projectile layer is static environment. If you would rather use an opt in system, set ProjectileTrace to ignore by default and ensure all visible trace presets have the ProjectileTrace channel set to block. Any new preset will also have to remember to add this channel.
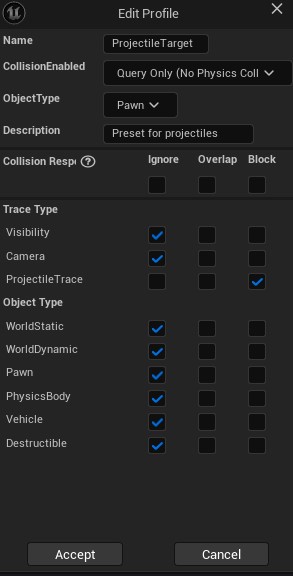
Next up is to make a collision preset in the section below. Create a new preset and call it ProjectileTarget. This is the preset that we will give to the rollback primitives. Set all trace types to Ignore except for the new ProjectileTrace layer which can be set to Block. This should also be QueryOnly and the ObjectType can be set to Pawn for now.
Once these have been set up you can set up the Default Projectile Collision Channel in the Project Settings->Gunsmith Settings. This should be set to your new ProjectileTrace channel but can be overridden per projectile later if needed.
Network Prediction Plugin Settings
At the time of writing this documentation, Gunsmith has only been developed to use the Network Prediction Plugins Fixed ticking policy. This setting can be found in Edit->Project Settings->Project->Network Prediction. The Mover component also only works with the Interpolated Simulated Proxy Network LOD setting but work is being done to improve Forward Predict mode. Feel free to play with other settings, in particular Enable Fixed Tick Smoothing and the Fixed Tick Frame Rate.
