Title here
Summary here
GAS is built on top of Unreal Engine’s default network layer which means many of the features that the Network Prediction Plugin provides to enable server-authoritative rollback in Gunsmith are incompatible. However, it is possible to set up Gunsmith to be used as a weapon system and for Gunsmith attributes and attachments to nicely interface with GAS attributes to get the best of both systems.
Caution
NPP Independent mode and the GAS implementation of Gunsmith is Client-Authoritative. This means that the client can potentially cheat and is therefore not recommended for competitive multiplayer games.
Once your Gunsmith plugin is set up, navigate to the Network Prediction tab in your project settings and set “Preferred Ticking Policy” to Independent. It is also recommended to disable your “Predict Damage Application” checkbox in the Gunsmith Settings tab as now that each player has their own timeline, gameplay logic is much less predictable.
The GSShootingComponent implements the IAbilitySystemInterface so that it can easily access the owners Ability System Component. The default functionality for this is to call UAbilitySystemGlobals::GetAbilitySystemComponentFromActor on the owning actor and return the result. If your own implementation differs from this you will need to create your own component that inherits from GSShootingComponent and implement your own functionality.
GSShootingComponent also has a SetupAbilityComponent function that must be called once the AbilitySystemComponent has been initialized with InitAbilityActorInfo. This is required to avoid checking if the AbilitySystemComponent exists on tick and without calling this, you may see some functionality not work or attributes not set up properly. Please see the L_TestGym_GAS map and AGunsmithGASMoverCharacter in the Demo project for reference.
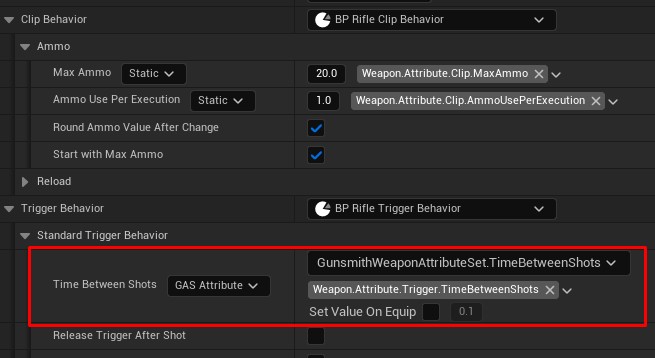
When the NPP “Preferred Ticking Policy” option is set to Independent, a new dropdown will show next to any FGSWeaponAttribute defined in a weapon behavior. Setting this to GAS Attribute will show a new panel which allows you to select which GAS attribute the attribute will read from. Any Gunsmith modifiers will be applied to the GAS attribute value which allows you to use each system as you prefer. However, attribute changes that affect the local shooting simulation instantly should always be applied with Gunsmith attachments as it will ensure that the attribute change is applied at the exact time.
Another option has also been provided which will set the owning ASCs GAS attribute to the defined value when the weapon is equipped. It is recommended to have a unique attribute for each weapon feature that you’d like to access in GAS and then reuse that attribute for each weapon. An obvious example of this is a Damage attribute which might be 5 for one gun, which will later get set to 20 for another gun that is equipped.
Note
The weapon preview will read the value from the editor pawns AbilitySystemComponent if it is valid. If you have not set up the ASC on the editor pawn, you can still use the value next to “Set Value On Equip” as the default.
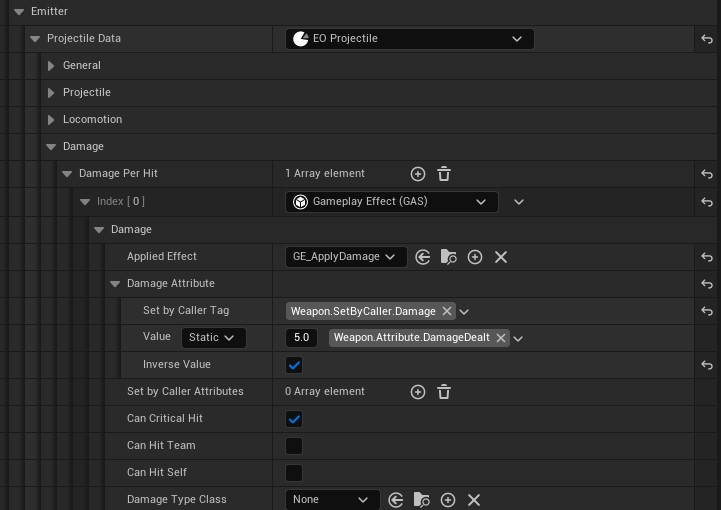
A new damage format has been provided which can apply a Gameplay Effect to any hit target.
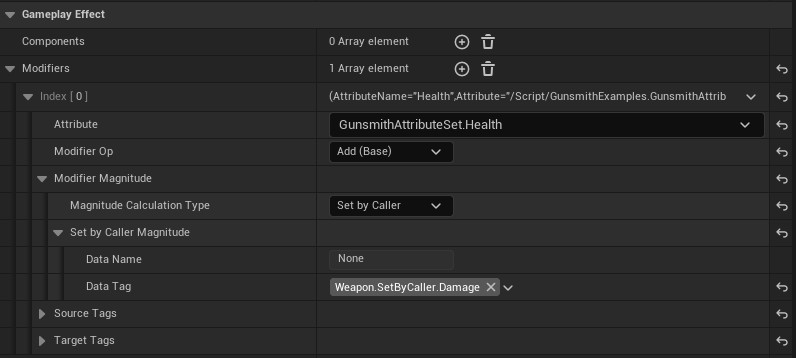
You can also specify SetByCallerMagnitude values which allow you to set any dynamic parameters on the Gameplay Effect if required. Ensure the SetByCaller Tag matches in the damage format and the Gameplay Effect as shown below.
Using a GameplayEffect to apply damage means that you can use a GAS attribute as your health value rather than using the Network Prediction Plugins simulation states health value in the GSHealthComponent. You can also use Gameplay Cues with Gameplay Effects as usual. An implementation example is provided in the Demo project.