Title here
Summary here
It is highly recommended that your player pawn inherits from GSAnimatedCharacter as this provides you with easy to access animation logic.
As animation setup will be unique to each project, characters have been set up so that the functionality that returns the animation asset can be overridden. To implement it in your own project, override GetAnimDataForWeaponType and return the GSCharacterAnimationData of your choice based on the equipped weapon. The simplest setup here is to return the already created BP_Rifle_Animations asset.
If you wish to implement animations yourself, feel free to inherit from GSCharacter instead. This class should always be the base character class as it will allow you to reuse the pawn in your Gunsmith weapon viewport and provide core functionality such as recoil decay.
There are two main components that need to be set up before you are able to shoot a target: GSShootingComponent and GSRollbackComponent. The GSShootingComponent should be added to the player pawn and controls everything related to the weapons and the shooting. The default equipment loadout will be empty but we will go through the process of creating and equipping a new weapon in the next section.
The pawn must also inherit from the GSShootingInterface which allows us to get access to the shooting component easily and also set the pawn to be the input producer for the shooting simulation. By overriding the ProduceShootingInput function and setting the InputProducer variable, we can send inputs from the player to the shooting component. Below is a very simple example of how to implement this but feel free to customize it to whatever works in your own project.
void AExampleCharacter::BeginPlay()
{
Super::BeginPlay();
// Set the input producer to this pawn
ShootingComponent->InputProducer = this;
}
void AExampleCharacter::SetupPlayerInputComponent(UInputComponent* PlayerInputComponent)
{
Super::SetupPlayerInputComponent(PlayerInputComponent);
// Bind any input actions required for the shooting simulation
if (UEnhancedInputComponent* Input = Cast<UEnhancedInputComponent>(PlayerInputComponent))
{
if (LookInputMouseAction)
{
Input->BindAction(LookInputMouseAction, ETriggerEvent::Triggered, this, &AGunsmithMoverCharacter::OnLookTriggered);
}
if (FireAction)
{
Input->BindAction(FireAction, ETriggerEvent::Started, this, &AGunsmithMoverCharacter::BeginShooting);
Input->BindAction(FireAction, ETriggerEvent::Completed, this, &AGunsmithMoverCharacter::EndShooting);
}
}
}
void AExampleCharacter::OnLookTriggered(const FInputActionValue& Value)
{
const FVector2D LookInputs = Value.Get<FVector2D>();
LookRotation.Yaw = += LookInputs.X;
LookRotation.Pitch = FMath::Clamp(LookRotation.Pitch + LookInputs.Y, -90.0f, 90.0f);
// Apply the inputs to the control rotation with the recoil included. AGSCharacter::Tick will handle the decay of recoil
if (APlayerController* PlayerController = GetController<APlayerController>())
{
PlayerController->SetControlRotation(LookRotation + CurrentRecoilRotation);
}
}
void AExampleCharacter::BeginShooting()
{
bIsShootingInputDown = true;
bHasJustPressedShootingInput = true;
}
void AExampleCharacter::EndShooting()
{
bIsShootingInputDown = false;
}
void AExampleCharacter::ProduceShootingInput(float DeltaMs, FGSShootingInputState& InputCmd)
{
// Send inputs to the simulation via the mutable struct
FGSDefaultShootingInputs& DefaultInputs = InputCmd.DataCollection.FindOrAddMutableDataByType<FGSDefaultShootingInputs>();
DefaultInputs.LookRotation = LookRotation;
// bHasJustPressedShootingInput is necessary to ensure that the simulation receives at least one frame of the shooting input
DefaultInputs.bIsShooting = bIsShootingInputDown || bHasJustPressedShootingInput;
bHasJustPressedShootingInput = false;
// We could also add custom inputs/structs here if needed
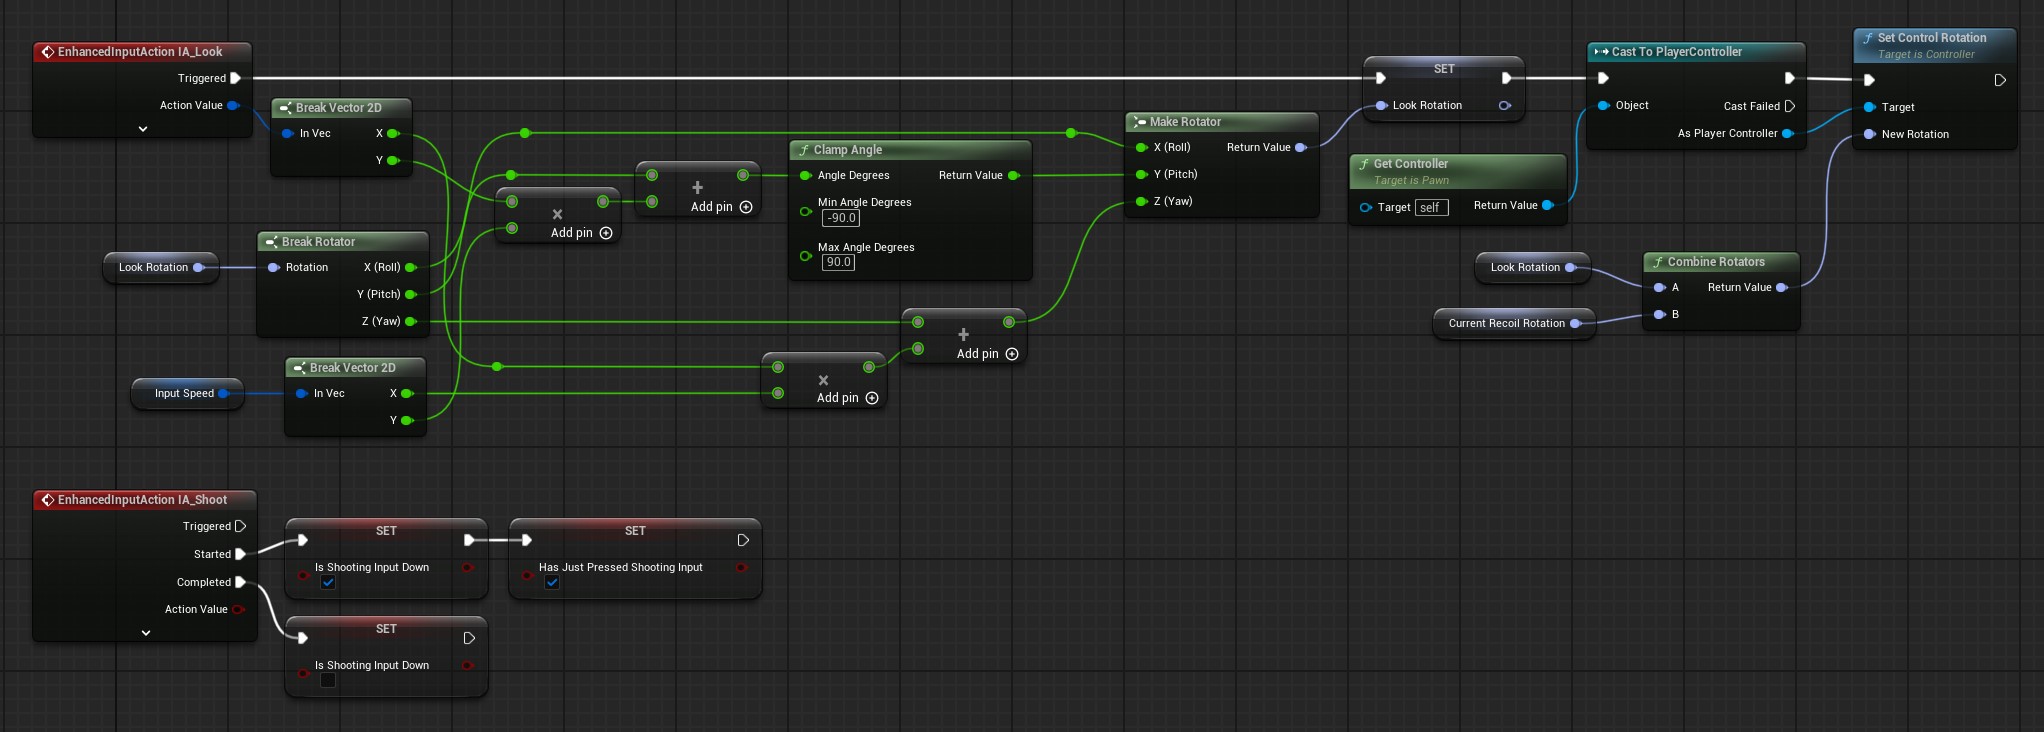
}Set the Input Producer and add the input mapping context.
Apply the inputs to the LookRotation variable based on the InputSpeed and to bIsShootingInputDown and bHasJustPressedShootingInput. These are all defined inside this BP.
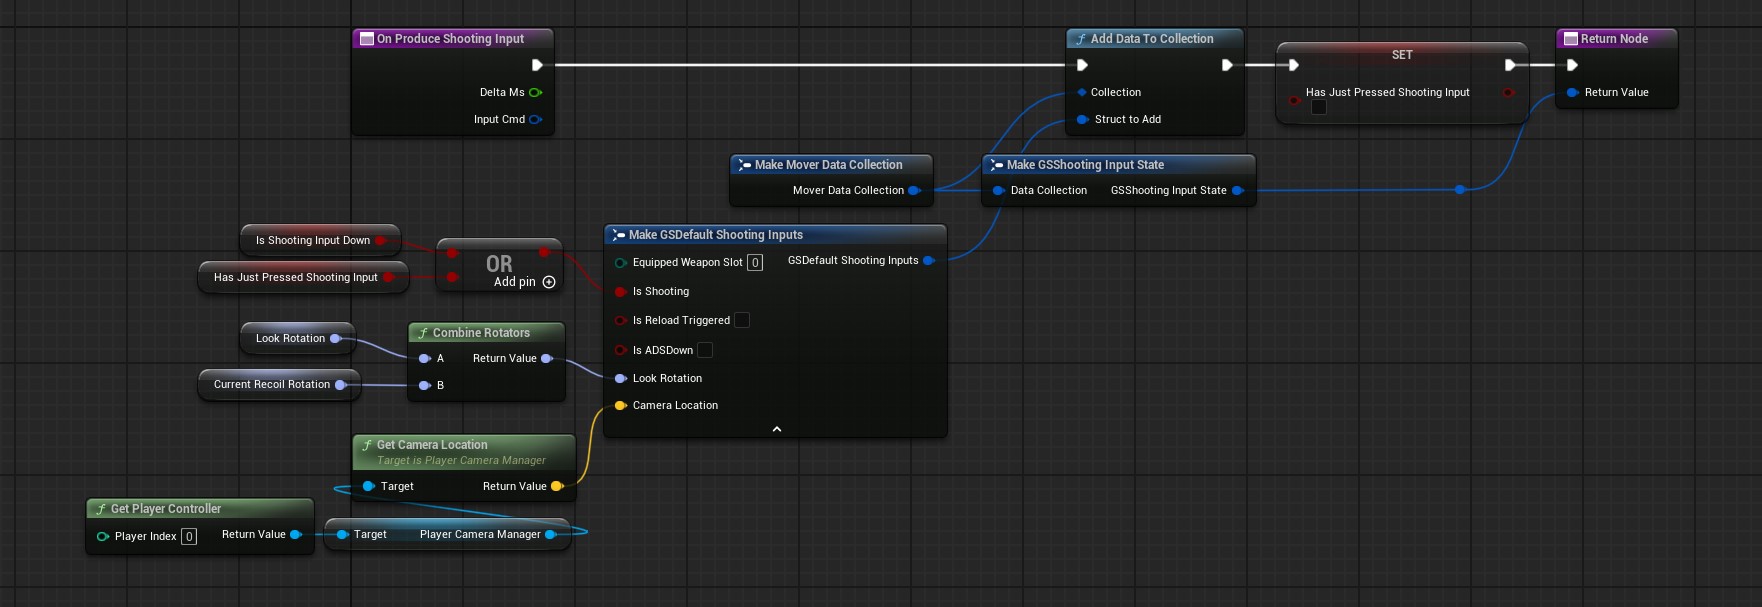
Override OnProduceShootingInput and feed the inputs into the Shooting Component.
Note
By default, Gunsmith targets the main character mesh to attach a weapon’s mesh to. If you need to attach to a different mesh, this can be assigned by overriding GetWeaponAttachmentComponents and providing the reference to the new scene component.
The second component is the GSRollbackComponent and should be added to any actor that needs a primitive component to be recorded and used when rolling state back for hit validation. The pawn should also inherit from the GSRollbackInterface and implement GetRollbackComponent for easy component access.
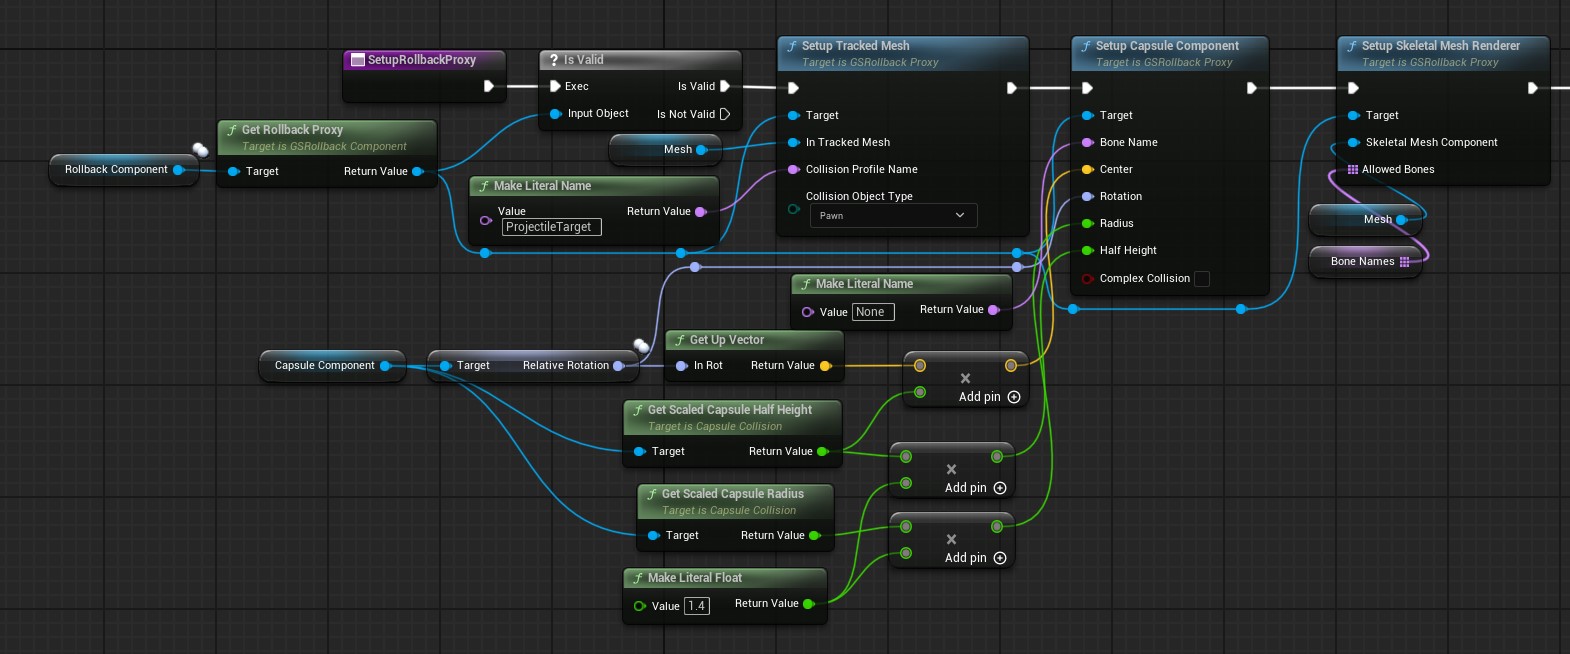
On BeginPlay the GSRollbackComponent will spawn a GSRollbackProxy which is an actor with identical primitive setup to the owning actors collision but set up with the collision profiles that we created in the previous step. This is the actor that the projectiles will hit and it means that when we roll back history for hit validation, we can avoid moving the actual character and potentially writing over any state.
In this example, the primitive setup exists in the pawn’s skeleton asset so we can use SetupSkeletalMeshRenderer which will extract that and reproduce the collision setup from the matching bones as basic shapes. RollbackBones is a list of bones that we would like to create the primitive for and the collision profile and object names must match the ProjectileTarget collision preset that we set up in the previous section. Once set up, change the collision profile of the SkeletalMeshComponent so that we no longer hit it with projectiles.
The capsule component is also used here to set up simple collision. All hit traces are completed in two steps; the first hit is to hit the simple collision and if that hit is successful it is disabled and the trace must then hit the complex collision. This is to prevent moving each of the complex colliders every frame and to also minimize the complexity of the scene that we’re tracing against. The capsule size is multiplied by a flat 1.4 to ensure that all complex colliders should be within the full capsule shape and bounds for all animations.
void AGunsmithMoverCharacter::BeginPlay()
{
  Super::BeginPlay();

  ShootingComponent->InputProducer = this;

  AGSRollbackProxy* RollbackProxy = RollbackComponent->GetRollbackProxy();
  if (RollbackProxy)
  {
    if (USkeletalMeshComponent* SkeletalMeshComponent = GetMesh())
    {
      RollbackProxy->SetupTrackedMesh(Mesh, RollbackCollisionProfileName, RollbackCollisionObjectType);

      // Use the character capsule as our simple collision
      if (CapsuleComponent)
      {
        constexpr float SizeMultiplier = 1.4f;
        const FRotator CapsuleRelativeRotation = CapsuleComponent->GetRelativeRotation();
        const FVector CapsuleCenter = CapsuleRelativeRotation.Quaternion().GetUpVector() * CapsuleComponent->GetScaledCapsuleHalfHeight();
        RollbackProxy->SetupCapsuleComponent(NAME_None, CapsuleCenter, CapsuleRelativeRotation, CapsuleComponent->GetScaledCapsuleRadius() * SizeMultiplier, CapsuleComponent->GetScaledCapsuleHalfHeight() * SizeMultiplier, false);
      }

      // Extract bone info from the skeletal mesh to create the complex collision
      RollbackProxy->SetupSkeletalMeshRenderer(Mesh, RollbackBones);

      // Remove collision from projectiles but make sure we can still trace against it for weapon visibility
      SkeletalMeshComponent->SetCollisionEnabled(ECollisionEnabled::QueryOnly);
      SkeletalMeshComponent->SetCollisionResponseToAllChannels(ECR_Ignore);
      SkeletalMeshComponent->SetCollisionResponseToChannel(UGSDeveloperSettings::Get()->DefaultTargetTraceCollisionChannel, ECR_Block);

      if (GetWorld()->IsNetMode(NM_DedicatedServer))
      {
        // Make sure we update the animation on the server too
        SkeletalMeshComponent->VisibilityBasedAnimTickOption = EVisibilityBasedAnimTickOption::AlwaysTickPoseAndRefreshBones;
      }
    }
  }
}These two components should be enough to get started with shooting and hitting targets but there is a third component that most games will probably require at some point - GSHealthComponent. This component stores the health state of the owner which will be reduced when hit by a projectile. This is also accompanied with a GSDamageTargetInterface which the pawn must inherit from and a GetHealthComponent function to override. Once added, the rest of the simulation should apply the damage automatically but feel free to bind to a couple of the events that are provided such as OnDamageTaken and OnDeath.